
Instagram is basically taking over the world. Whether you’re a newbie or you’ve had the app since it was iPhone-only, there are still plenty of tricks you can learn to enhance your photos, get more Instagram followers and get more likes on your Instagram photos. (Screenshots are from the iPhone app. Follow me @wtfab1)
1. Hashtags. If you aren’t already using hashtags effectively on Instagram, prepare to have your mind blown. Similar to Twitter, hashtags help your photos get seen by other users. Instagram allows 30 hashtags max per photo. A few important #hashtag tips:
– Only use a few relevant hashtags in your caption. Otherwise it looks spammy.
– If you used 3 hashtags in your caption, add a comment with 27 more of the most popular Instagram hashtags in a comment.
– You can find the top Instagram hashtags that will get you the most views here.
– I’ve taken the top 50 or so hashtags from the above link and copy/pasted them into a note on my phone. That way, when I want to add some hashtags in a comment on a photo, I can quickly just copy/paste some into the comment box.
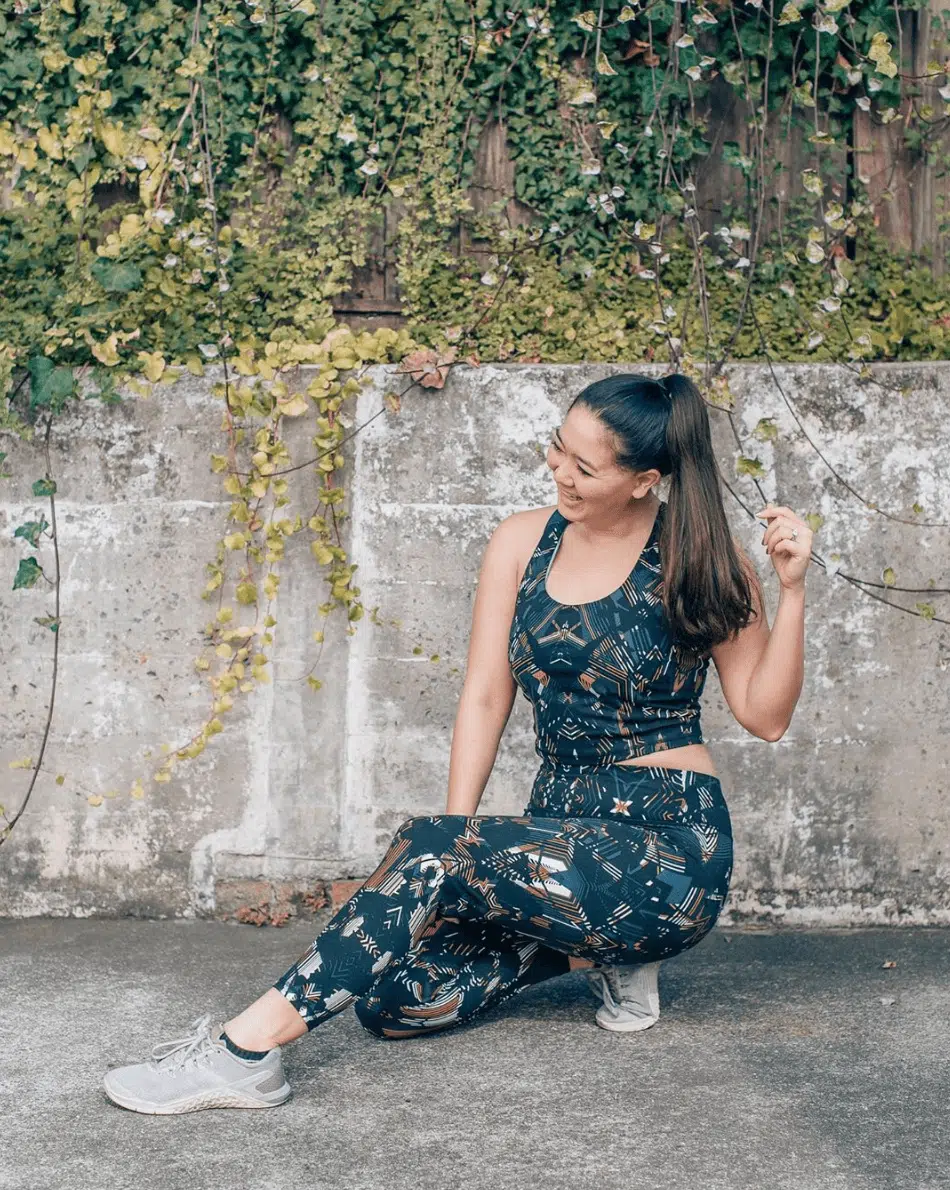
2. Combining photos. Sometimes you want to combine multiple photos into one frame. Instagram doesn’t have a way to do this, but there are tons of other apps you can download. My personal favorite is Pic Jointer, but there’s also PicStitch, Instapic Frames, Photo Collage Free and lots of others. I use Pic Jointed all the time for ootd posts, like this one:

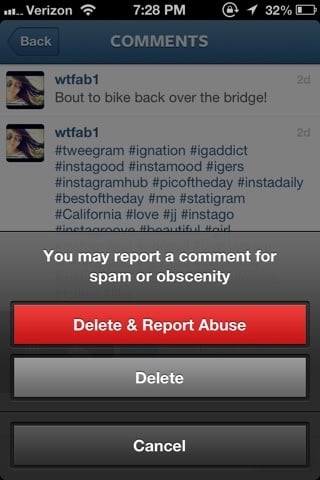
3. Deleting comments. Instagram has gotten a tad spammy, so being able to delete annoying comments (or embarrassing ones about last night’s endeavors?) is key. Below, you can see that I have a lovely spam comment. To get rid of it:
– Click on the “Comment” button
– Swipe your finger from left to right over the comment you want to delete
– Hit delete and voila! Clean, unspammy photo


4. Tagging peeps. Always a good idea. Tag not only your friends, but brands and products. I’ve tagged CookingLight, Restaurant.com and RedCarpetManicure. They now follow me and comment photos I tag them in.
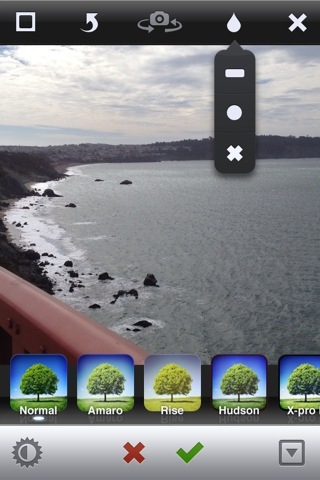
5. Blur tool. This will make you feel artsy-fartsy with little to no effort. Touch the water drop icon and select whether you want your blur effect to be in the shape of a rectangle or circle. The X will get rid of the blur effect. Tips:
– You can change the size and location of the blur effect on your photo by moving the blur around with one finger, or using two fingers to increase/decrease the size of the blur. In this second pic below, I’ve used a medium sized circle blur in the center of the pic.
– You can change the angle of the blur rectangle. Place two fingers on the screen and twist them clockwise or counter clockwise. In the third pic below, I’ve used the rectangle blur and changed the angle of it so it matched the bar in the corner of my photo (that’s actually part of the golden gate bridge).


6. Liking photos. Everyone likes it when people like their photos. That’s sort of the point of being a photowhore on Instagram, isn’t it? Engaging with other Instagrammers is the best way to get likes on your own photos and gain Instagram followers. A super easy way to like someone’s photo from your home screen is to double tap it. Easy, huh?
7. Geotagging. Another way to get more people to see your pics. When you post a photo you’ll be asked where it was taken. Add that info in, same as you would when you check in on Facebook or Foursquare. Here, you can see Monroe, a club in North Beach, has been geotagged in a bunch of people’s photos. There’s me n my girls in the top right!
8. Connecting online. Instagram recently connected with Twitter, so when you tag someone or a product, brand, etc, on Instagram and share it on Twitter, that person/product/brand will also be tagged on Twitter (if their Instagram account is connected to Twitter). Instagram makes it really easy to share your photos on Twitter, Facebook and Tumblr, but if you want people on your blog or website to be able to view your Instagram photos, you’ll need to use an Instagram web-viewer, like web.stagram. For example, on WTFab, I link up to my Instagram photos via web.stagram.
9. Use other photo editing tools. If you’re sick of the same ol’ filters and want to spice things up a bit, use another photo editing app on your photo before you run it through Instagram. Again, there are a ton, but my favs are Pixlromatic and Color Splash.
10. Fitting vertical pictures. Always a bit tricky due to the fact that Instagram only allows square pics. Here’s my solution.
– If you’ve taken a vertical pic on your phone that you want to put on Instagram, edit it within your phone’s regular photo viewer and rotate it so that it is horizontal. The pic will now be sideways.
– Open up the pic on instagram. You can either leave the pic as is with black side borders (like in the first photo below), or scale the photo so that it fills up the entire square (like second pic below–some of the top/bottom of your pic will get cut off).
– After you hit “Choose” hit the curved arrow in the top bar until it rotates your pic back to vertical. Ta-da!


Elise Armitage is an entrepreneur and founder of What The Fab, a travel + lifestyle blog based in California. At the beginning of 2019, Elise left her corporate job at Google to chase her dreams: being an entrepreneur and helping women find fabulous in the everyday. Since then, she’s launched her SEO course Six-Figure SEO, where she teaches bloggers how to create a passive revenue stream from their website using SEO. Featured in publications like Forbes, Elle, HerMoney, and Real Simple, Elise is a firm believer that you can be of both substance and style.


Panda Monika
Friday 21st of April 2017
Thanks, great post. I find your opinion quite interesting, but the other day I stumbled upon a completely different advice from another blogger, I need to think that one through, thanks for posting. Ceme Online
Gracelina Amelia
Friday 21st of April 2017
Really amazing, Your articles were very nice and full of information. Thanks, great post. I really like your point of view! Ceme 99
Nevi Chen
Friday 21st of April 2017
Thanks for this wonderful post and hoping to post more of this. Bandar QQ
Kenny Nev
Friday 21st of April 2017
This is so interesting, I have never seen this before , Nice Post. Bandar Domino
HennyLyn
Monday 17th of April 2017
I would like to thank you for the efforts you have made in writing this article , Your article very well and good, thanks for posting. Judi Capsa